What is this Standard Peripheral Library (SPL)?
It’s just a collection of hardware libraries that provide an easy approach to any STM32 ARM programmer. It has support for every peripheral a STM32 micro has like CAN, USB, ADC, Timers, etc. In short it’s a hardware abstraction layer fully covering the STM32.
Why use the ST SPL?
- Reduce coding time by spending less time figuring out 32 bit register values and going through a near thousand page reference manual.
- Take the advantages of the built-in code library of MikroC which other compilers don’t offer.
- SPL is used by most STM32 ARM programmers and so it is a widely used tool with a large community.
- Most books and documents on STM32 ARMs are based on SPL.
- A compiler like MikroC doesn’t give full focus towards STM32. It has other ARM concerns like TI’s TIVA, NXP, etc and so MikroC’s built-in libraries are not 100% compatible with all ST hardware.
- Following the previous point MikroC (at least at the time of writing this article) doesn’t give library support for hardware like the DMA and so there’s incompleteness to some extent. It is also worth noting that depending on MikroC’s library also has the disadvantage of code size and efficiency. It is in general true for every compiler. However MikroC’s IDE is cool enough to do things with ease and that’s why I like it. Unless you are a Maple or Arduino fanboy, you’ll get my point.
Software Needed
- Modified ST Standard Peripheral Library (SPL) as supplied here: STM32 Standard Peripheral Library for MikroC. It works for STM32F10x micros only.
- MikroC PRO for ARM compiler.
- Flash Loader Demo or ST-Link Programmer Software.
Hardware Needed
- A STM32F10x Development Board.
- A USB-Serial Converter or ST-Link Programmer.
- Some basic components like a mini bread board, connecting wires/jumpers, a LED, a 220Ω 0.25W resistor and a push button.
- Optional debugger hardware.
How to use the Standard Peripheral Library?
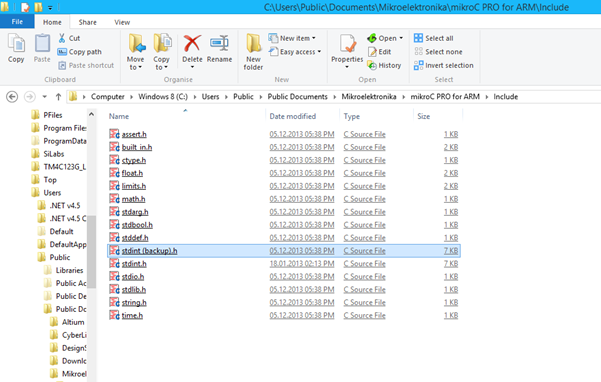
First we need to prepare our MikroC PRO for ARM compiler for linking with SPL. I’m assuming that the compiler is preinstalled. First go to the compiler’s installation folder and look for the include folder. In my case, it is:
C:\Users\Public\Documents\Mikroelektronika\mikroC PRO for ARM\Include.
In this folder there’s a file named stdint.h. It’s basically a definition of variable types and other related stuffs. Rename it to stdint (backup).h and copy the new stdint.h file from the supplied folder to this location. We are done here.
Next we have to change some options of the compiler. Launch the compiler and the follow as shown below:
Tools >> Options >> Output Settings
Check Case sensitive. Apply and close this window. We are halfway done.
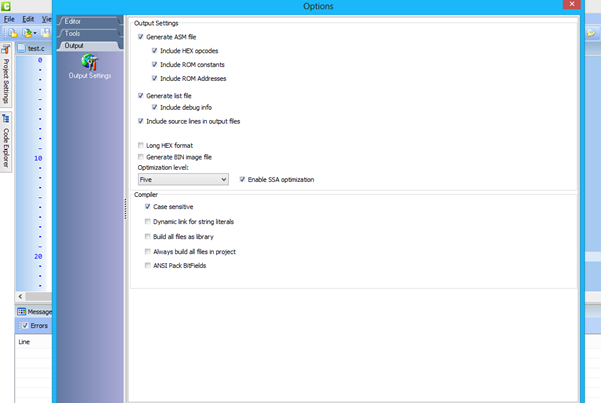
Since the compiler will, from now on, be case sensitive, special attention will highly be needed to avoid coding misfortune. It is wise to follow same naming, case and convention through a complete program to avoid both mistakes and unwanted errors.
There are two ways of adding the SPL with a project. The first technique is to keep the SPL is a fixed location like a specific folder which usually will not be moved or changed frequently. It will be like a PC’s Windows folder that is usually not touched unless needed. The other method is to copy the SPL folder and paste it in project folders. No matter what you do you’ll always have to include the .c and .h files located in that folder whenever you start a new project. This is done with the help of either the compiler’s Project Manager or Project Wizard. As we may know that these files are essential for the SPL to work properly with any compiler, not a single missing file is acceptable. Thus care should be taken when these files are added and their search paths shown.
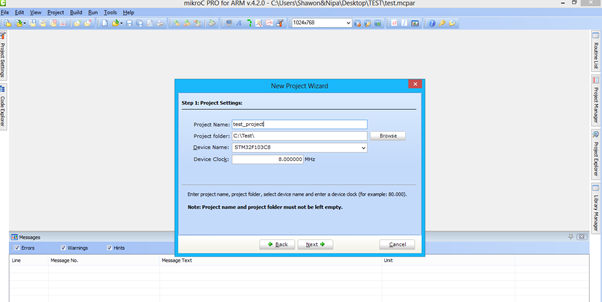
Like as always we will start a MikroC PRO for ARM project but there are few steps we need to notice carefully.
Next we will add all the .c and .h files located in the SPL folder.
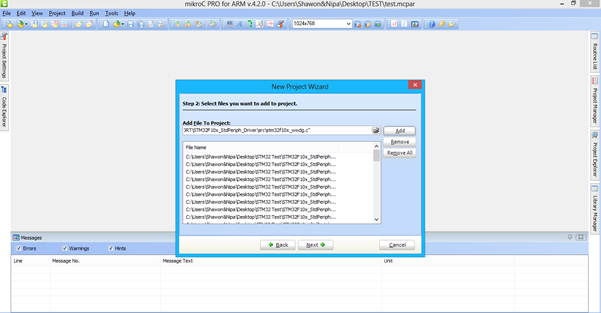
Make sure all the files are added. If you missed any of these then the SPL won’t work and then you’ll have to use Project Manager to identify and add them separately.
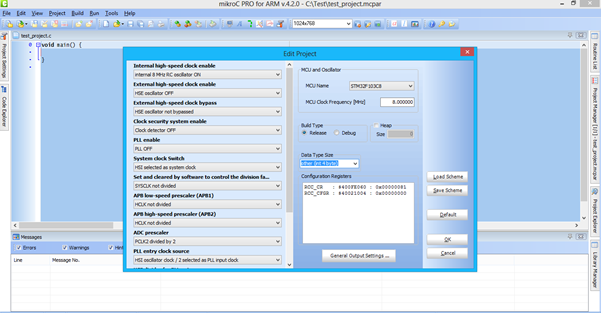
Open Project Editor to set fuses and make sure that you changed the Data Type Size to other (int 4 bytes).
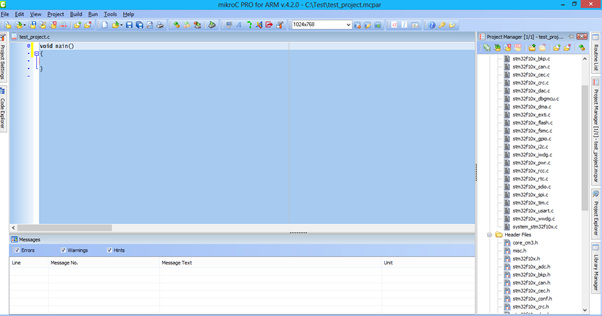
Notice the Project Manager and check that all needed files have been included.
Now we are good to go for coding with SPL alongside us. Just make sure you include those peripherals header file only that you need to use.
I have made an example and here it goes:
#include “stm32f10x_rcc.h”
#include “stm32f10x_gpio.h”
void setup();
void main()
{
unsigned int t = 900;
setup();
while(1)
{
if(GPIO_ReadInputDataBit(GPIOA, GPIO_Pin_3))
{
t = 400;
}
else
{
t = 900;
}
GPIO_SetBits(GPIOA, GPIO_Pin_0);
VDelay_ms(t);
GPIO_ResetBits(GPIOA, GPIO_Pin_0);
VDelay_ms(t);
};
}
void setup()
{
GPIO_InitTypeDef GPIO_InitStructure;
RCC_APB2PeriphClockCmd(RCC_APB2Periph_GPIOA, ENABLE);
GPIO_InitStructure.GPIO_Pin = GPIO_Pin_0;
GPIO_InitStructure.GPIO_Mode = GPIO_Mode_Out_PP;
GPIO_InitStructure.GPIO_Speed = GPIO_Speed_10MHz;
GPIO_Init(GPIOA, &GPIO_InitStructure);
GPIO_InitStructure.GPIO_Pin = GPIO_Pin_3;
GPIO_InitStructure.GPIO_Mode = GPIO_Mode_IPU;
GPIO_Init(GPIOA, &GPIO_InitStructure);
}
Compile the code and wait. It takes a bit more time than usual due to separate compilations and so be patient. The compiler will highlight external components with red wave-like markings but don’t worry these are not errors that are being tracked the compiler. However be sure of case sensitivity or otherwise even a tiny error will lead to a large one. For example don’t write delay_ms(100); instead write Delay_ms(100); as specified by the compiler’s manual.

Notice that the compiler compiled the code successfully.
In this doc I discussed about STM32F10x series micro’s SPL but this same concept can be applied to other STM32 micros. Just make sure you use the right SPL for the right family.
With SPL and MikroC’s IDE and other supports the combined effect is like a double-edged sword. I hope it helps all who are struggling with STM32 ARMs.
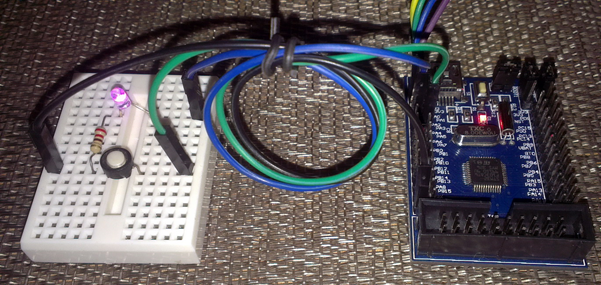
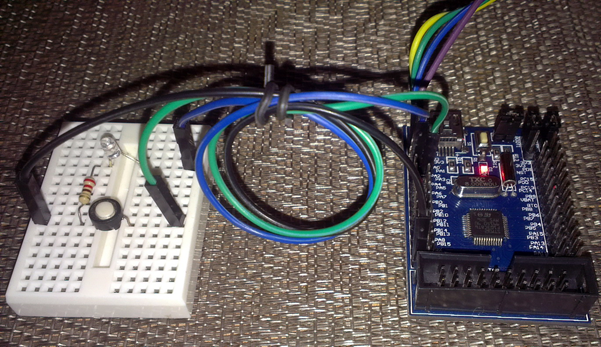
Here’s the demo.
Author: Shawon M. Shahryiar
https://www.facebook.com/groups/microarena
https://www.facebook.com/MicroArena