Earlier we looked at a method of programming ESP8266 to send sensor data directly to Google Sheets without using any third party modules. Now, we will expand that a little bit and learn to send an email as well as a text message (SMS) using ESP8266. In this demo, we will configure our ESP8266 to send an email and a text message when the value of a variable (which could be a sensor output, or any other physical quantity) goes beyond a threshold limit.
This is not entirely a new topic as there are similar tutorials available online to show how to do this. This article particularly focusses on just using the ESP8266 and Google environment to send email or a text message.
Send Text and Email from NodeMCU
Hardware requirement:
To understand the concept, all we need is an ESP8266 module and a power supply for it, usually a USB cable. I am using a NodeMCU board for convenience. We do not need any sensors or other things. For illustration of the method, we will just generate a random number between certain intervals, and if the number goes beyond what we have set for threshold limit, we would like to receive an email and/or a text message.
Prepare a Google Sheets:
Just like in pushing data to ESP8266 to Google Sheets, we will create a new Google Sheet in a Google Drive. So, let’s do the following:
1) Open up your Google Drive in a web browser and create a Google Sheets. You can call this file whatever you like. I called it ‘SendEmailAndText_ESP8266’.
2) From the Google Sheets that you just created, go to Tools > Script editor…
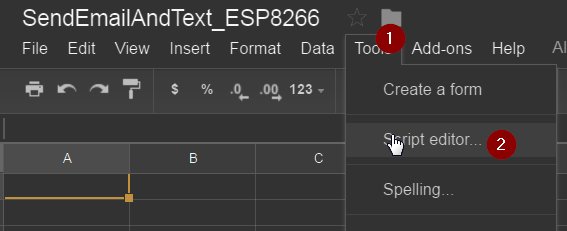
GAS > Tools > Script Editor
3) Give a name to the Script editor main file in the toolbar (whatever you like).
4) Paste the following code to the Code.gs file (assuming you haven’t change the default file name). Again, this filename doesn’t matter either.
Google Scripts Code:
// Created by: Akshaya Niraula // Date: 2016 December 15th. // Steps are valid as of 2016 December 15th. // 0) From Google spreadsheet, Tools > Script Editor... // 1) Write your code // 2) Save and give a meaningful name // 3) Run and make sure "doGet" is selected // You can set a method from Run menu // 4) When you run for the first time, it will ask // for the permission. You must allow it. // Make sure everything is working as it should. // 5) From Publish menu > Deploy as Web App... // Select a new version every time it's published // Type comments next to the version // Execute as: "Me (your email address)" // MUST: Select "Anyone, even anonymous" on "Who has access to this script" // For the first time it will give you some prompt, accept it. // You will need the given information (url) later. This doesn't change, ever! var number = "8001239999"; // your phone number var domain = "tmomail.net"; // You may find your domain for you carrier at: http://www.emailtextmessages.com/ var toEmail = "YourOrFriendsEmail@gmail.com"; function doGet(e){ Logger.log("--- doGet ---"); // for debugging if (e == null){e={}; e.parameters = {value:"-1"};} try{ // get the values from parameters to local var var value = e.parameters.value; var phoneEmail = number + "@" + domain; // Send Text Message (SMS) send_Email(phoneEmail, "NodeMCU here, your sensor went beyond your threshold. Sensor reported: " + value + " on:" + new Date()); // Send Email var message = "<b>Dear User,</b> Your equipment has reached it's threshold value. It just reported a value of " + value + ". Please take a necessary action. "; message += "As a valued customer, we have sent you a text message also. "; message += "To learn more about this email, please click on the link below: "; message += "<a href="http://www.embedded-lab.com/" target="new">www.Embedded-Lab.com</a> "; message += "Sincerely, <b>NodeMCU ESP8266</b>"; send_Email(toEmail, message) return ContentService.createTextOutput("Things went successfully."); } catch(error) { Logger.log(JSON.stringify(error)); return ContentService.createTextOutput("oops...." + error.message + "\n" + new Date() + "\nnumber: " + number + + "\ndomain: " + domain); } } function send_Email(address, message){ MailApp.sendEmail({ "to": address, "subject": "Threshold reached - ESP8266", "htmlBody": message }); Logger.log("send_textMessage: " + "Email sent to: " + address); } |
Download Google App Script Code
Test the progress:
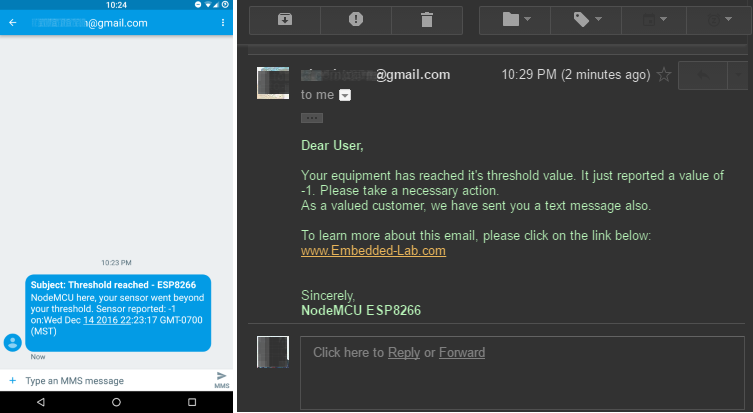
As shown in the image below, select doGet and click on bug icon to debug your code. If you followed the steps properly, you should have received a text message and an email from you gmail account.
Please note Google will need your permissions to send email on your behalf so when Google asks for the permission, you must provide it.
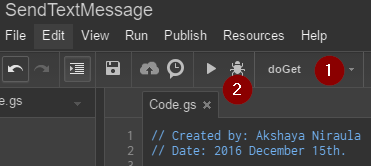
GAS > Debug > DoGet
If you didn’t receive a text message and/or an email, please double check your steps. If you did receive then let’s publish our work so that we can get a URL which we can use in NodeMCU. To publish, click on Publish > Deploy as web app…
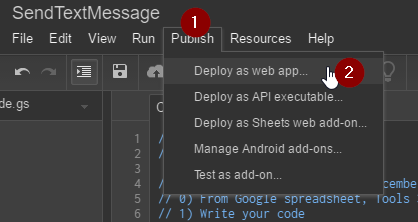
GAS > Publish menu
Above action will show the following window. Make sure to select all the three steps as shown in the image below.
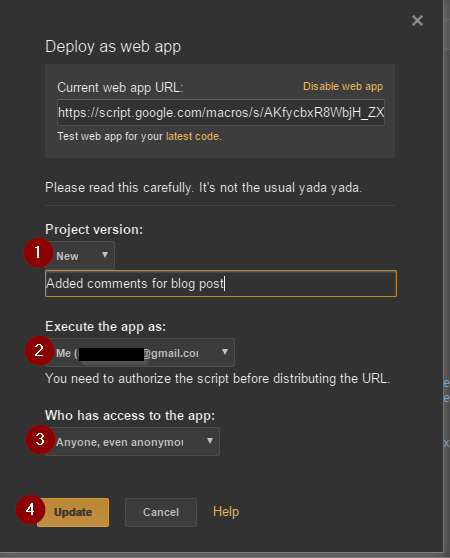
GAS > Deploy as Web App
When you click on Update or Publish, you will see a box as shown below. From this box, copy the given address. I usually save this address back into Google Script for future use. We will need this address in NodeMCU/ESP8266 code.
Note: we will call the text between /s/ and /exec as GScriptID. This information is required in NodeMCU code.

GAS > Deploy as web app > Result
Grab the URL from above box and append the “?value=-1” to it, it will look something like this:
https://script.google.com/macros/s/—YourGScriptIDGoesHere—/exec?value=-1. Now paste this URL to your browser’s address and press enter. In a few seconds you should receive an email and a text message.
NodeMCU / ESP8266 Code:
Please make sure to grab the library file that helps us redirect to the URL that we need. This process has been explained in How To Post Data To Google Sheets Using Esp8266.
// BY: Akshaya Niraula
// ON: Jan 4, 2017
// AT: http://www.embedded-lab.com/
#include <ESP8266WiFi.h>
#include “HTTPSRedirect.h”
const char* ssid = “–Your SSID–“;
const char* password = “–Your Password–“;
// The ID below comes from URL
// after publishing Google Script as Web App.
const char *GScriptId = “–Your GScriptId–“;
const char* host = “script.google.com”;
const char* googleRedirHost = “script.googleusercontent.com”;
const int httpsPort = 443;
HTTPSRedirect client(httpsPort);
// Prepare the url (without the varying data)
String url = String(“/macros/s/”) + GScriptId + “/exec?”;
const char* fingerprint = “F0 5C 74 77 3F 6B 25 D7 3B 66 4D 43 2F 7E BC 5B E9 28 86 AD”;
void setup() {
Serial.begin(115200);
Serial.println(“Connecting to wifi: “);
Serial.println(ssid);
Serial.flush();
WiFi.begin(ssid, password);
while (WiFi.status() != WL_CONNECTED) {
delay(500);
Serial.print(“.”);
}
Serial.println(” IP address: “);
Serial.println(WiFi.localIP());
Serial.print(String(“Connecting to “));
Serial.println(host);
bool flag = false;
for (int i=0; i<5; i++){
int retval = client.connect(host, httpsPort);
if (retval == 1) {
flag = true;
break;
}
else
Serial.println(“Connection failed. Retrying…”);
}
// Connection Status, 1 = Connected, 0 is not.
Serial.println(“Connection Status: “ + String(client.connected()));
Serial.flush();
if (!flag){
Serial.print(“Could not connect to server: “);
Serial.println(host);
Serial.println(“Exiting…”);
Serial.flush();
return;
}
// Data will still be pushed even certification don’t match.
if (client.verify(fingerprint, host)) {
Serial.println(“Certificate match.”);
} else {
Serial.println(“Certificate mis-match”);
}
}
// This is the main method where data gets pushed to the Google sheet
void sendValueToGoogle(String value){
if (!client.connected()){
Serial.println(“Connecting to client again…”);
client.connect(host, httpsPort);
}
String urlFinal = url + “value=” + value;
client.printRedir(urlFinal, host, googleRedirHost);
}
// Continue pushing data at a given interval
void loop() {
// Here you will have your main code
// To demonstrate the concept we are generating a random number
long randomValue = random(10, 20);
// Our lower threshold is 12 and upper threshold is 18
// when given vlaue goes below lower or above upper the threshold
// we would like to send information to GAS for email and text message
if (randomValue < 12 || randomValue > 18) {
Serial.println(“Random value outside the threshold: “ + String(randomValue));
sendValueToGoogle(String(randomValue));
}
delay (10000); // wait 10 sec
}
Download Arduino .ino code file
The post How to send email and text messages using ESP8266 appeared first on Embedded Lab.